- BY Rex Plastics
- POSTED IN Product Development
- WITH 1 COMMENTS
- PERMALINK
- STANDARD POST TYPE
Rex Plastics Product Development
Plastic Part Design Fundamentals
Ejection and Surface Finish
Ejection
When it comes to successful plastic part design, ejection and surface finish considerations are critical factors to consider. The most common way to remove a part from the mold is through ejector pins. They apply a force to eject a part from the mold, and in some cases can leave marks, sometimes called ‘witness lines’.
At Rex Plastics, we make a point to design and position ejector pins that minimize their effect on your parts, moving any undesired witness lines to a location where they may not be an issue.
Pins are located in the B-side mold half, the side in which the part will stay when the mold opens. Once the mold is opened, the pins extend into the mold cavity, push the part out, and then retract, allowing the mold to close and be refilled. The image below shows an example of what the witness lines may look like after pins push the part out of the mold:
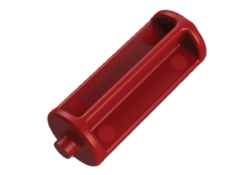
Let us know if there are critical surfaces in the plastic part design where witness lines left by the mold ejection could potentially be an issue. At Rex Plastics, we can propose an ejection layout for approval before spending money to build the mold.
Types of Ejection
While pins are most commonly used for ejecting a part from a mold, they are not the only option. The table below shows a short list of other commonly used ejector systems:
| TYPE | GEOMETRY |
| Pins | Round |
| Blades | Rectangular |
| Sleeves | Tubular |
| Stripper Plate | Moving Plate |
Pins are common on most parts however they are not ideal for every situation. Ejector blades are rectangular in shape and can be utilized on thin walls that cannot support a circular pin.
Sleeves are ideal for bosses. They provide a 360 degree bearing surface around the boss which facilitates easy part removal. Stripper plates provide ejection around the entire perimeter of the part. Its goal is to “strip” the part off of the core.
Surface Finish
When it comes to plastic part design and surface finish, there are two main considerations to keep in mind – polishing and texturing.
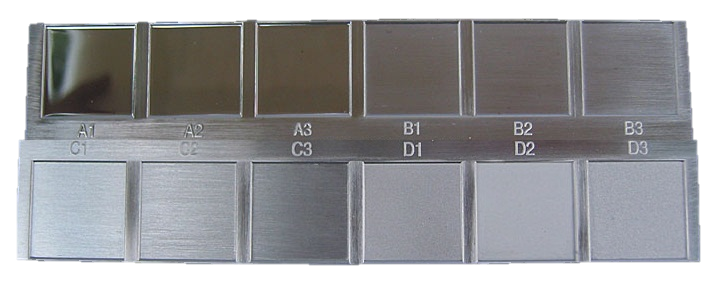
Polishing: Polishing is a manual process that removes texture, machining marks, etc. on the mold surface and provides a uniform finish. Polishing can be very time consuming, especially if there are deep ribs in the mold. The picture at the bottom of this post shows a variety of SPI finishes.
Texturing: There are several ways to texture a mold surface such as bead blasting, EDM, or etching. A surface with heavy texture will require increased draft angles in order to release from the mold.
SPI Surface Finishes
Below, you’ll find some standard mold finish call-outs (priced low-to-high). While these standard SPI call-outs are very common, a wide variety of textures are available. Some textures that can be applied include:
- Natural\Exotic
- Micro Surface Finishes
- Multi-Gloss Patterns
- Graphics
- Leather Grains/Hides
- Woodgrain, Slate and Cobblestone
- Geometric and Linens
- Images or Logos incorporated into the pattern
SPI Surface Finish Examples
You will find a few examples of various SPI Surface Finishes in the image, below:
More Fundamentals of Plastic Part Design
- Fundamentals of Plastic Part Design – Part 1: Injection Molding
- Fundamentals of Plastic Part Design – Part 2: Draft
- Fundamentals of Plastic Part Design – Part 3: Sink and Warp
- Fundamentals of Plastic Part Design – Part 4: Ribs and Bosses
- Fundamentals of Plastic Part Design – Part 5: Gates and Parting Lines
Learn More
Are you an inventor interested in developing a plastic product? Learn about our Prototyping and 3D Printing Services here.

The blog “Fundamentals of Plastic Part Design – Part 6: Ejection and Surface Finish” provides a detailed exploration of the critical aspects of part ejection and surface finish in plastic injection molding. The author clearly explains how these factors influence both the functionality and aesthetic quality of molded parts. This informative piece is invaluable for designers and engineers looking to enhance product performance and customer satisfaction. Thank you for sharing this essential knowledge, and I look forward to more insightful posts on plastic part design principles in the future!